
THANK YOU VERY MUCH, REALLY. If after reading the hull post, with its entertaining anecdotes about misaligned rudder blades and purulent hydrolytic bubbles, you continue reading this guide, thank you. As a reward, we allow you to go up on deck, where we will once again face the corrosion and rotten delaminations and check the solidity and sealing of all the accessories. Sounds good!
Getting Started
So now we’re on board. To start, we’ll take a look at the first video in a series of four we found around where a French expert examines (in a fast-track manner) a sailboat. Although we’ll follow a more exhaustive approach, the video will help you get familiar with how to move around on board without looking too much like a novice.
Here, what interests us most is to see how he checks the fastening of the stanchions and the fore and aft balconies. We will follow his example and do the same, but in a more meticulous way because we are risking our good money: we will not skip a single piece in search of signs of weakness, leaks or corrosion, whether in the bases of the stanchions or in the rest of the deck elements. From there we will move on to the hatches, windows and cockpit.
But each thing in its time. To understand what we are checking, the first thing is to see what a typical deck looks like and how the different accessories should be fixed to it.
Sandwich Construction

▌Anatomy of a core deck. In more modern boats, the core material is usually PVC foam, which, being a closed-cell foam (i.e., not communicating with each other), slows the spread of water in the event of a leak. In boats with a wood core, the wood can rot if it comes into contact with water, damage that will be multiplied by the various freeze-thaw cycles it will have gone through if the boat has been moored in a cold enough place in winter. It is aspects like this that make it so important to know the history of the boats we are thinking of buying..
Almost all decks are made using a construction system called sandwich, with two outer skins and a core of balsa wood, plywood or PVC foam. This core is used for its lightness and strength, as well as for its thermal and acoustic insulation qualities.
Despite its advantages, one of the main risks in sandwich-built decks is water leaks. When water penetrates the core, it can cause rot or delamination, weakening the structure and even affecting the interior of the boat. Therefore, one of our main objectives will be to detect any signs of these leaks.
Leaks can have many different causes. Namely:
- Poor condition of the portholes and hatches.
- Cracks at the base of the mast.
- Defective joints between the hull and the deck.
- Poor sealing of screws on accessories such as winches, clamps or chain plates.
There is nothing inherently wrong with the sandwich construction system, but we can have unpleasant surprises if errors have been made in design, manufacturing or in the installation of accessories.
Most problems usually come from the latter route. The decks are designed (or should be) to be absolutely waterproof, but it is normal for owners to need to fix various elements, such as, for example, when they want to return all the maneuvering to the cockpit. If they do the work themselves without knowing exactly where they are getting into, they can create a water entry point that over time ends up rotting the core or separating it from its outer skins. And since we will be looking at used boats, there will have been time for that to happen.

▌The fittings, in this case a cleat, must be fixed with bolts, with reinforcing strips on the inside and at a point on the deck where there is no core, but only solid fibre. This last condition obviously depends on the original design and if it is not met there is little we can do.
If when checking the fittings we find old holes that have simply been covered with putty we are dealing with a bad job: we cannot fill them like that and forget about it. The fibre expands and contracts with the different cycles of cold and heat and after that come the cracks and leaks..
Leaks and Soft Decks

▌Depending on the size of the damaged area and its location, repairing a deck can be difficult and expensive..
Sponginess
To check the condition of the cover, it is a good idea to take off your shoes and walk with your toes pressing on the ground, which will allow you to detect areas that give way or are excessively flexible. Although a certain degree of elasticity is normal, you can imagine that something is wrong if this variation exceeds a centimeter or the same areas on both sides of the deck behave differently. In the case of delamination, you may also notice a creaking sound.
Creaking
Do you hear a little noise? Does the deck seem to be not strong enough? Here’s how to proceed: Stand on the suspect area with your feet together to concentrate your body weight, then move up and down as if you were exercising your calves. Don’t jump, just push. Do you notice the deck sinking? Well, you can almost go look at the next boat, but since we’re at it, we can complete the inspection with the percussion test, which consists of hitting the area we are examining with a nylon hammer or a screwdriver handle. When the knocking makes a loud sound, everything is assumed to be in order, but a dull sound can be a sign of delamination; unfortunately, it’s not always easy to tell the difference.
Visual Examination
Finally, we will complete our array of non-destructive inspection techniques with a visual examination, during which we will look for elongated, brown-tinged cracks. If we see many, that is a bad sign. These types of cracks usually indicate the presence of water leaks that have caused corrosion or rot in the core. They can also be a sign that structural stresses have exceeded the strength of the deck due to poor design, poor sealing of fittings, or inadequate repairs.
Stanchions: Safety and Watertightness

▌Corrosion around metal fittings: If you see any signs of corrosion around cleats, bitts, fairleads or the plates holding them together below deck, fear the worst. Corrosion accelerates when wet stainless steel is deprived of oxygen – right where it’s not easy to see. A little rust can be a sign of a big problem..
The stanchions are the main source of leaks on a deck, as well as an essential safety element. When we lean on them, the force transmitted to their base is multiplied several times by the law of the lever, so we need them in perfect condition, for the good of the boat and ourselves. In the stanchions we will look for signs of corrosion, cracks in their base that could be a source of leaks and we will check the solidity of the fixings.
It happens that sometimes it is not even possible to examine the stanchions properly because accessing them from the inside is not possible or easy. This means that a hypothetical leak may never have been repaired and will continue to spread until someone takes action or the boat slowly becomes a wreck.
Portholes and Hatches: Critical Points for Leaks

▌If you have any doubts about portholes and hatches, it is best to ask around. Getting the opinion of owners of the same boat model is free and worth its weight in gold..
Leaks around window frames are a serious problem. They cause damage to laminates, woodwork, mattresses, etc., and can be a symptom of very difficult-to-fix design errors that affect the entire boat. Let’s not forget that repairing leaks in portholes and hatches is rarely solved with simple caulking.
Checking the Portholes
What can happen with them is that the deckhouse (the part of the cabin that looks out onto the deck) is weak and its frames cannot withstand all the forces they are subjected to when sailing. To diagnose this problem, we will follow these steps:
- Frame condition: A tactile and visual examination of the frames to see if they are bent or deformed. Pay attention because it is not always obvious.
- Pressure test: Apply pressure around the frames. If the frame or the deck gives way, it indicates a structural problem. We will also stand on top of the frames and, following the system described for determining the sponginess of the deck, we will see if our weight causes the frames to move.
- Percussion test: Gently tap the exterior wall of the deck where the portholes are with a hammer. Is it well tempered or does it seem to shake?
- Interior examination: We will look for signs of humidity, paying special attention to cushions, mattresses and upholstery, which indicate leaks.
Checking the hatches
Here, the headaches are usually due to incorrect installation, which is difficult to correct. The story usually goes like this:
A. The deck does not have an adequate support structure inside and sags to some degree, making it impossible to seal the hatches perfectly. As with the portholes, the only solution is structural reinforcement work. A mess.
B. The deck is fine, but the opening in which the hatch is installed is poorly designed. If the builder simply cut a hole in a core deck, fitted a hatch and screwed it in, that’s a source of trouble: any movement will weaken the seal and the screws. If these are loose and cannot be tightened, that’s a bad sign.
The Cockpit: A Key Place for Comfort and Safety
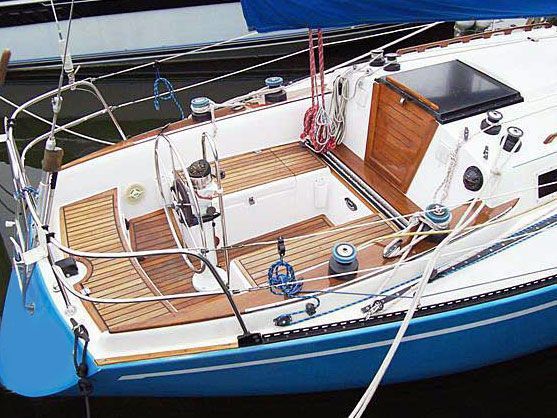
The cockpit is probably the place where we will spend the most time, so it will not hurt to give it the attention it deserves. In addition to everything mentioned so far about cracks, corrosion, etc., we will check the good condition of the seats, the floor and the lids of the chests, whose interior we will also inspect, something that is often overlooked.
If we find the chests full of bags of sails and other equipment, do not hesitate to empty them to put our head inside. Likewise, we will take a look at the place where the gas cylinder is housed, which must have ventilation. While we are at it, we will also check the condition of the regulators, which being made of aluminum can rust, and the expiration date of the tube connected to the cylinder, not so much for the price of replacing it but for what it would tell us about the attention the boat has received if we found one that has been expired for some time.
Finally, it would be good to answer some common sense and general questions, which are the ones we like the most: Is the cockpit comfortable? Is there enough space for the helmsman? Does it offer good support when the boat heels? Is it protected from wind and spray? And from the sun? Does it include a bimini, awning, ladder or bathing platform and are these elements in good condition? Regarding the last point, we should bear in mind that the fabrics and vinyls on the exterior are not eternal and that they must be replaced every 5 to 7 years. If you see that they are worn, that means an additional investment.
Summary of key points
- Fixing check: Check the fixing of stanchions, fore and aft balconies, looking for signs of weakness, leaks or corrosion.
- Sandwich deck construction: Check for leaks in the deck core, which may be balsa, plywood or PVC foam, which could cause rot or delamination.
- Deck leaks: Check for possible leaks caused by problems with portholes, hatches, mast base, hull-to-deck joints or poor bolt sealing.
- Sponginess and creaking: Detect soft or delaminated areas by walking on the deck and performing pressure and percussion tests.
- Visual examination for cracks: Visually inspect the deck for elongated, brown-tinged cracks, which could indicate leaks or structural failure.
- Stowage and balconies: Ensure the strength and tightness of the bow and stern stawage and balconies, as they are critical points for leaks and safety.
- Portholes and hatches: Evaluate the condition of the frames, perform pressure and percussion tests, and look for signs of leaks around the portholes and hatches.
- Structural problems: Identify deformations or problems in the structure that make it difficult to properly seal hatches and portholes.
- Checking the cockpit: Inspect seats, floor, chests, the gas cylinder location, and other elements such as the bathing platform, ensuring that they are in good condition and provide comfort and safety.
- Comfort and general condition of the cockpit: Check whether the cockpit is comfortable, has enough space and is protected from wind, sun and splashes, as well as checking the condition of elements such as the bimini, awning or ladder.
Too much text? Listen to the podcast:
GALLERY OF HORRORS

▌The deck core beneath this mast is giving way, a problem often associated with water leaks. Note the depression around the base and the cracks in the fiberglass.

▌Mounting deck fittings without securing them to a structural element or using a reinforcing plate inside is a bad idea. In this case, the movement of a stanchion has given way to leaks and degradation of the core. Note how the owner of this boat tried to secure this piece by tightening the screws, which were only supported by washers that were clearly insufficient, even though he only managed to collapse the roof and aggravate the problem..
INSPECTING A SECOND-HAND SAILBOAT: A COMPLETE GUIDE