
TODAY, PLAEASURE BOATS are mostly made from fibreglass, a material that has revolutionised boating by reducing the costs of purchasing and maintaining boats. However, although fibreglass offers great advantages, it is not easy to give it an attractive finish, so cabin walls are often covered with panelling and carpentry. For those unfamiliar with sailboats, it is easy to fall into the trap of judging them by their interior.
Manufacturers have long been aware of this trend among first-time buyers, and often invest in nice finishes while saving on other things, such as an efficient insulation and ventilation system to prevent moisture problems.
Aesthetic aspects are very important, but they cannot be decisive.
It is clear that nobody likes an ugly design. The interior of some boats looks like a waiting room at a doctor’s office, with only the plastic plant missing. But aesthetics, which are very important, should not be the determining factor. When it comes to inspecting a boat, a good dose of pragmatism is in order.
The proof
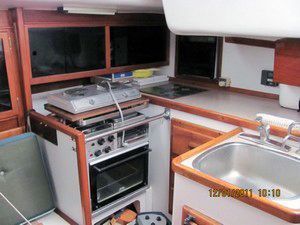
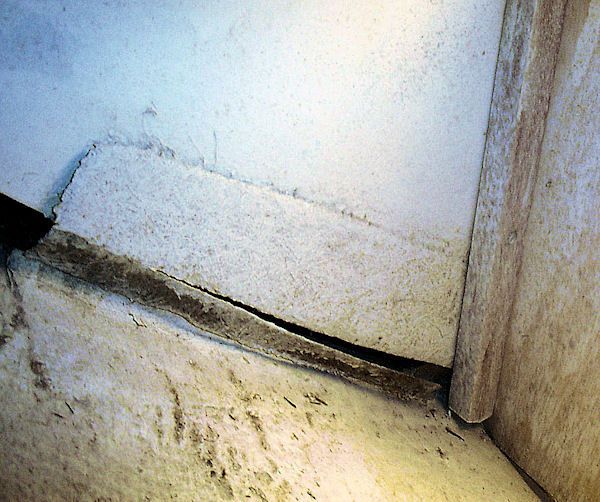
The following images show the interior of a second-hand sailboat. It appeared to be in immaculate condition, but when the deck was lifted, the base of the mast was found to be rotten. The seller had used ozone spray to mask the bad smells.

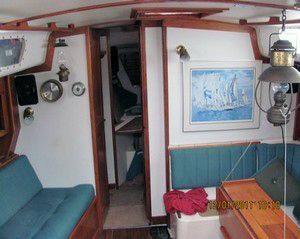
▌You should never buy a boat without thoroughly examining the bilge. If the owner or the broker refuses to let you remove the floor covers (the broker could justify himself by saying that if something is damaged, he would be responsible), you should stop the visit there and discard that boat.
Before you go in: Check the entry hatch
When you begin your inspection of the interior of a sailboat, the first thing to do is to examine the sliding hatch that covers the entrance before going down into the cockpit:
- Does it slide smoothly?
- Is it sturdy enough to support the weight of a person?
- Is it protected by a sprayhood that prevents water from entering the interior?
A poorly maintained driveway could be an indication of broader maintenance issues or a lack of protection from the elements.
Carpentry and interior finishes
Once inside, we will look at the carpentry work.
- Quality of finishes: Is the varnish smooth and uniform or, when passing the hand over it, do we feel roughness? Poorly executed finishes can be a sign of hasty repairs or lack of maintenance.
- Ceiling panels: If the ceiling is covered with wooden panels, can they be easily removed in case of leaks? Ease of access for repairs is key in a second-hand boat.
- Lockers and floor covers: We will open the lockers located under the sofas and bunks, as well as the floor covers, to check the condition of the less visible areas. Remember that many fiberglass boats are built with counter-moulds, so not all interior areas will be accessible and possible damage may not be evident.
Bulkheads and frames: structural inspection
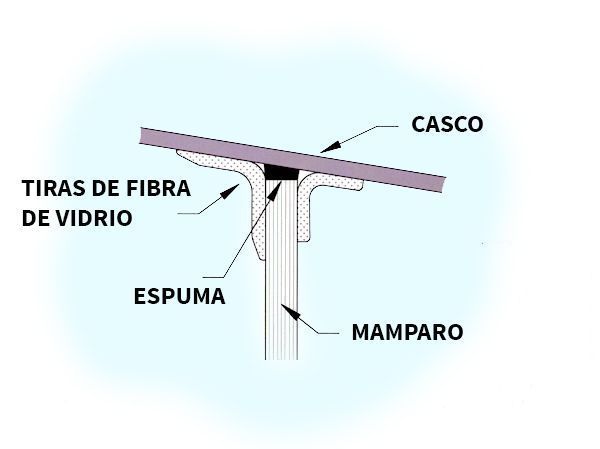
Bulkheads (i.e. the “walls” that divide the different sections of a sailboat’s interior transversely) are not just there to organize space. They serve the structural function of strengthening the hull and deck and supporting the mast.
Bulkheads and frames are often attached to the interior walls of the hull with fiberglass strips. One problem we might encounter is that if the assembly was not done correctly or has degraded over time, the hull will have been weakening.
We will proceed to:
- Bulkhead-hull bond: Inspect the bond between the bulkheads and the hull. Check that it has been done correctly on both sides (inside and outside) and that it does not show signs of degradation, such as cracks or separations. If the design of the boat makes it difficult to inspect both sides, you may be able to use a selfie stick and mobile phone, a mirror or some other similar device.
- Reinforcement with fibreglass strips: Check that a single fibre strip has not been used, which would result in excessively weak reinforcement.
- Hard spot: Check if there is a foam strip between the bulkhead and the hull, as indicated in the image above. Not all manufacturers bother to work this way, but the bulkheads should not directly touch the hull to avoid the formation of a hard spot that puts pressure on the hull, makes it easier for it to bend and damage the laminate. To remain rigid, the hull must not lose its curvature.

▌The hull-bulkhead bond rarely weakens on the hull side, but often comes loose on the bulkhead side. As the damage is not always as obvious as in the picture on the right, to check that everything is in order we will take a knife, a spatula or some similar tool and poke around in the bond to check its condition. We can also perform the percussion test and see how it sounds.
When the problem areas are accessible, repairing those elements that have “simply” come loose is relatively easy, although it can be a messy and uncomfortable task if we decide to undertake it. On the other hand, if they cannot be accessed with reasonable freedom of movement but we still see signs of repairs, we will have to ask ourselves how they were done and carefully examine their quality.

▌Are there water marks at the base of bulkheads, inside lockers, or in the engine compartment? This could indicate that the boat has been flooded, or that there are leaks and water is collecting in the bilge.
Bulkheads and frames can break away from the hull due to an impact, the stresses they have been subjected to during navigation, excessive tension from the rigging (usually a backstay), which could have pulled on them and lifted them, or simply due to poor construction, and in that case it is important to know what other secrets the boat hides. That is why it is so important to know its history (in the latter case, what reputation does that model of boat have and the shipyard that built it).
Failures in the attachment to the hull of non-structural elements, such as the sofas or the V-berth, are less important, but we will have to know what they respond to and see if those elements fit well when trying to reposition them or if, on the contrary, we cannot adjust them because the hull is deformed.
The hull-deck union

▌Hull-deck connections usually follow one of these three systems.
The connection between the hull and the deck is essential for the structural integrity of the boat. Imagine the boat as a cardboard box that is made rigid by its lid without a cover.
To check the hull-deck connection:
- Fastening system: We will examine whether suitable fasteners have been used (bolts secured with nuts, rather than rivets, which is a poor way of working) and whether the distance between bolts is about 15 cm. Greater distances could allow the deck to separate from the hull.
- Leaks: We will inspect for possible leaks along the joint, especially in lockers, V-cockpit or the anchor locker.
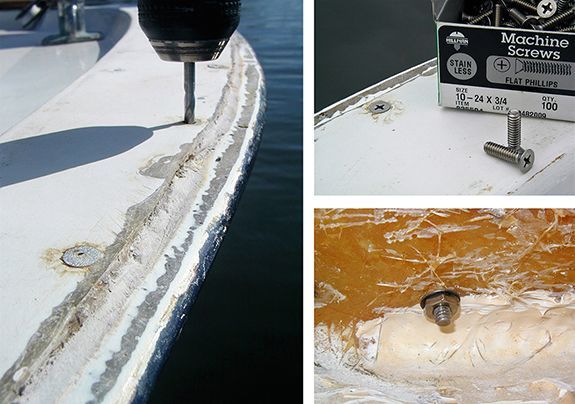
▌Replacing rivets with screws.
Portholes, hatches and deck fittings
Portholes and hatches are potential water entry points. Look for water stains or signs of moisture around them that indicate possible leaks, paying special attention to any suspicious fittings detected during the deck inspection. And if you like thrillers, you’re in luck, because this can turn into detective work: since the decks of many boats are constructed using a sandwich system, with two skins and a light material between them, the water entry point can be far from the exit point.
Bilge
The bilge is the lower cavity of the boat above the keel where the water that is filtered is collected and then expelled by the bilge pumps. What we do not want to find in it are traces of repairs or hydrolytic bubbles.
In the first case, repairs or the presence of cracks around the bolts that hold the keel would indicate that the boat suffered an impact against the bottom, which can have serious consequences in other parts of the boat.

▌Possible effects of a collision with the seabed. Evidence of impacts or cracks around bolts is a red flag.
Regarding hydrolysis, often (erroneously) called osmosis, we must know that it can also occur inside the boat. The water accumulated in the bilge mixed with diesel and oil from the engine and any other product that may have been spilled forms a more aggressive solution than sea water, which is why the bilge of a fiberglass boat must be perfectly sealed with epoxy resin.
A stranded ship may have a small degree of distortion in the hull.
Base of the mast: support points and deformations
If the mast of the boat rests directly on the deck, we will have to check that the main bulkhead and the unloading strut offer it adequate support; also, that the weight and force exerted by the mast is directed correctly and without deviations towards the keel and the lower part of the hull. To do this, in addition to examining and feeling its base for cracks, deformations and bulges, inside we will open and close any nearby doors, lockers or drawers and inspect the condition of the coverings: a poorly fitted or misaligned door, screws that have unscrewed themselves or sawdust and abraded edges caused by friction could be indications that the pressure of the mast or some other element is deforming the hull or bulkhead.
However, we must not forget that a stranded boat may have a small degree of distortion in the hull that is corrected when it is returned to the water and that in older boats it is not unusual to find doors that are out of adjustment. Therefore, if we see something that raises doubts, it would be a good idea to compare its appearance with the boat outside and inside the water.
Mattresses and upholstery

▌The stain on the upholstery seems to indicate possible leaks coming from the hatch above it..
Although these elements do not affect the performance of a boat, they do have a major impact on its habitability and replacing them is not exactly cheap. In addition, they can be a good source of information about the condition of the sailboat.
We will check:
- The wear and tear of the upholstery.
- The proper functioning of the zippers.
- The consistency of the foam.
- The presence of mold and mildew on any of its sides.
- The smell, looking for moisture, which could be an indication of leaks.
- And comfort, of course.
Summary of key points
Hull-deck bonding and components
- Inspect the fastening system and check the distance between bolts (approximately 15 cm).
- Look for possible leaks, especially in lockers and cabins.
- Look for signs of moisture or leaks around portholes and hatches, as these areas can be water entry points.
Bilge and mast base
- Check for cracks or repairs in the bilge that may indicate impact.
- Pay attention to possible hydrolysis (osmosis) problems, which can degrade fiberglass.
- Assess the mast base to check for adequate support and weight distribution.
- Look for cracks, bulges or deformations in the hull.
Upholstery and mattresses
- Although they do not affect the performance of the boat, upholstery and mattresses should be checked for wear, zipper functionality, foam consistency and the presence of mold and odors.
Too much text? Listen to the podcast:
GALLERY OF HORRORS
▌Broken hull-bulkhead joint.
INSPECTING A SECOND-HAND SAILBOAT: A COMPLETE GUIDE